Create and switch scenes
A project can have multiple scenes. You create and open scenes in the SCENES window, which you open with the scene button in the top bar. This page explains how to create a new scene, switch between scenes, and rename a scene.
The tests on this page were done in the oasisw.ai editor with one new project (macOS Chrome) on 2026-10-29. Unless noted otherwise, each action was tested once.
Before you start
- Some things are saved per scene, and some are shared by the whole project. Script files are shared by all scenes. Read What's per scene and what the project shares first.
Do it in the editor
Open the SCENES window
Click the fourth button from the left in the top bar (list icon). If the window is wide, the button also shows the current scene name. The SCENES window opens with the project's list of scenes. The scene that's currently open is marked CURRENT.
This window is also already open the first time you open the editor with a new project. On the left of the window are the project card and Project settings, Scenes, Version control, Builds & Publish, Team, and See all projects. To close it, click ✕ at the top right or press Esc.
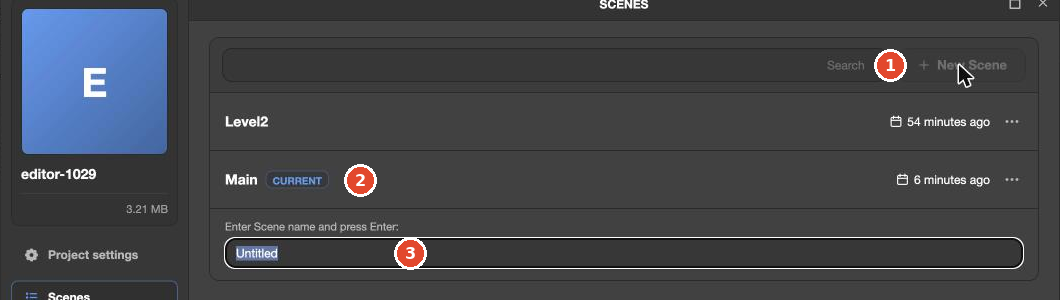
Create a new scene
- Click + New Scene at the top right of the SCENES window.
- An
Enter Scene name and press Enter:field opens below the list, containingUntitled, already selected. - Type a scene name and press Enter.
- The new scene opens right away. It opens in the same tab, and the bottom bar changes to
<project name> — <scene name>.
Open another scene
- Open the SCENES window.
- Click the name of the scene you want to open.
- The window closes and that scene opens in the same tab. The scene number at the end of the URL changes too.
You don't need to save before switching scenes. The editor saves your changes immediately.
Rename a scene
With nothing selected, type a new name in the Scene Name field at the top of the SETTINGS panel on the right and press Enter. The new name also appears in the list in the SCENES window. If an entity is selected, the panel switches to ENTITY, so click the selected entity in HIERARCHY once more to deselect it.
Scene menu
Click ⋯ at the far right of a scene row to see Duplicate Scene, Delete Scene, Item History, and Open in New Tab.
Pending Verify the results of Duplicate Scene and Delete Scene, and whether a deleted scene can be restored (to be moved to a separate page on duplicating and deleting scenes)
Let the AI do it
Create and open scenes yourself in the SCENES window, not in the AI panel. The AI works on the scene that's currently open. To have it make a game in another scene, open that scene first, click 새 대화 (New conversation) in the AI panel, and then send your prompt.
Check the result
- Check that
<project name> — <scene name>in the bottom bar is the scene you meant to open. - Check in the SCENES window that the scene is marked CURRENT.
Troubleshooting
| Symptom | Cause | Fix |
|---|---|---|
You created a new scene, but there's no floor in the viewport and HIERARCHY has only Root | New scenes are created empty | Add a camera, light, and floor yourself, or have the AI create them |
| You pressed Esc to close the ⋯ menu, and the SCENES window closed too | Esc closes the whole window | Click the scene button to open it again |
| You can't see the Scene Name field | An entity is selected, so the right panel is ENTITY | Deselect it |