Editor layout
The editor screen is divided into five areas. This page explains the name and role of each area, and how the right panel changes depending on what you select.
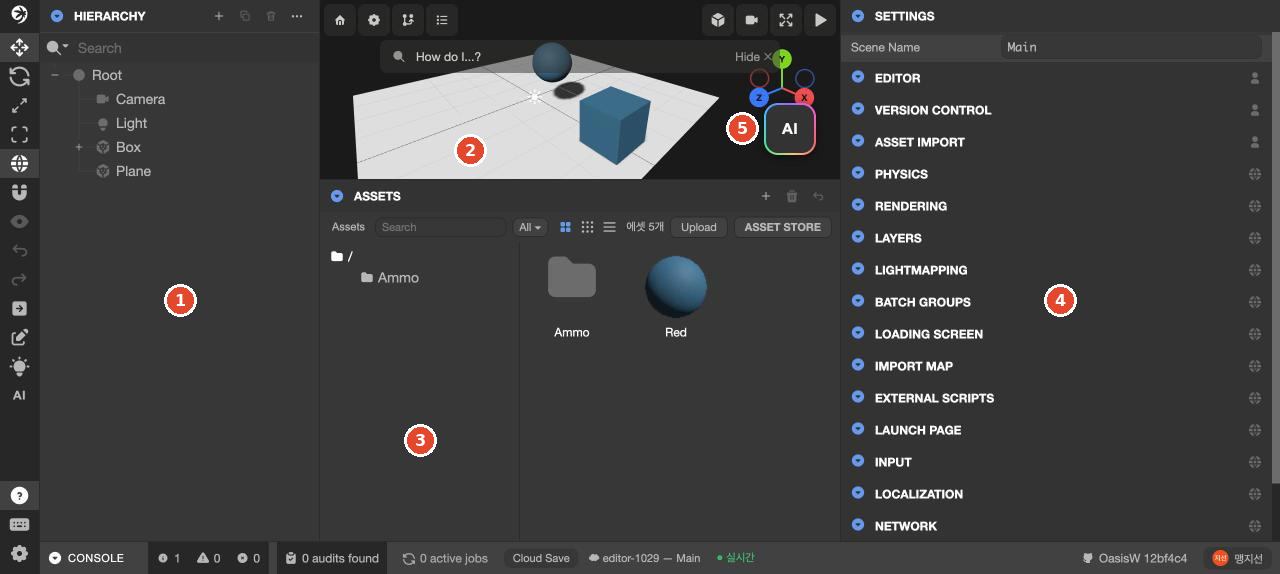
The five areas
| No. | Location | Name | What it does |
|---|---|---|---|
| 1 | Left | HIERARCHY | Shows the entities in the current scene as a hierarchy |
| 2 | Top center | Viewport | Shows the scene in 3D. You can click entities to select them |
| 3 | Bottom center | ASSETS | Shows the project's assets (materials, textures, audio, scripts, and so on) |
| 4 | Right | SETTINGS / ENTITY | Shows scene settings or an entity's properties, depending on the selection |
| 5 | Opens on the right (area 4) | AI GAME BUILDER | The panel where you send prompts to the AI and read its work reports |
HIERARCHY
All entities in the scene appear in a parent–child hierarchy. In scenes made by the AI, entities are often organized under group entities such as Environment, Lighting, Gameplay, and UI. Groups appear collapsed, so if you can't find an entity, expand a group with the + in front of it, or type the name in the Search field at the top of the panel.
Entities with <> before their name have a script attached. Only one icon appears even if several components are attached, so check ENTITY for the exact setup. For details, see HIERARCHY panel.
Viewport
The viewport shows how the scene is laid out. There's no mode for running the game inside the editor; you run the game in the game tab opened with Launch. Check the results of scripts and physics in the game tab. Something that looks fine in the viewport can look different in the game.
Move the viewport camera by dragging the mouse (orbit), the scroll wheel (zoom in/out), and W A S D (move). To move the camera to the selected entity, press F. For the full list, see Keyboard shortcuts.
ASSETS
The project's assets are shown by folder. On the left is a folder tree (root /, Materials, Scripts, and so on). There's a + at the far right of the panel's top row, and on the right of the row below it are the asset count (에셋 22개, "22 assets") and two buttons.
- + — Creates a new asset (Folder · CSS · CubeMap · HTML · JSON · Material · Script, and more).
- Upload — Uploads files from your computer.
- ASSET STORE — Opens the asset store. Downloaded assets go into the
Storefolder. For how to use it, see step 5 of Make your first game.
When the AI downloads store models while making a game, a Store folder is created automatically. Games that use physics get an Ammo folder containing the physics engine files.
Switch to list view (the three-line icon) to see the assets' Type column. The type filter applies only to the folder that's currently open, so if scripts are split between the root and the Scripts folder, check each folder in turn.
ASSETS belongs to the project, not the scene. That's why files used in other scenes also appear. This distinction is explained in What's per scene and what the project shares.
SETTINGS / ENTITY
The right panel uses one area for two purposes.
- When nothing is selected — SETTINGS appears. These settings apply to the whole scene. The items are covered in Scene settings and editor settings.
- When an entity is selected — ENTITY appears. Position · Rotation · Scale are at the top, followed by the attached components (RENDER, COLLISION, SCRIPT, and so on) and the + ADD COMPONENT button.
When you click an asset, the same area shows that asset's properties (for example, MATERIAL when you select a material).
AI GAME BUILDER
Click AI near the bottom of the left vertical toolbar to open the AI GAME BUILDER panel in place of the right panel (SETTINGS·ENTITY). You can also open it with the floating AI button at the bottom right of the viewport; this button glows while the AI is working. At the bottom is the input box where you write prompts, and at the top are 새 대화 (New conversation) and the conversation list. To close the panel, click ✕ at the top right or click AI again.
You can click ▶ Launch and ASSET STORE with the AI panel open. For how to use the panel, see Open the AI panel and send a prompt.
The AI panel's conversation list is kept per project. The same conversation stays open even when you switch scenes, so when you make a new game in a new scene, click 새 대화 first.
What changes with the selection
When you select an entity, three places change together.
- Its row is highlighted in HIERARCHY.
- A gizmo attaches to the entity in the viewport.
- The right panel switches from SETTINGS to that entity's ENTITY.
You can select an entity by clicking its row in HIERARCHY or by clicking it directly in the viewport. Clicking a highlighted row again deselects it, and the right panel goes back to SETTINGS.
Top bar and left toolbar
Outside the five areas are two bars that stay the same when you switch scenes. Here we cover only where they are and their main functions. For button-by-button descriptions, see Top bar and left toolbar.
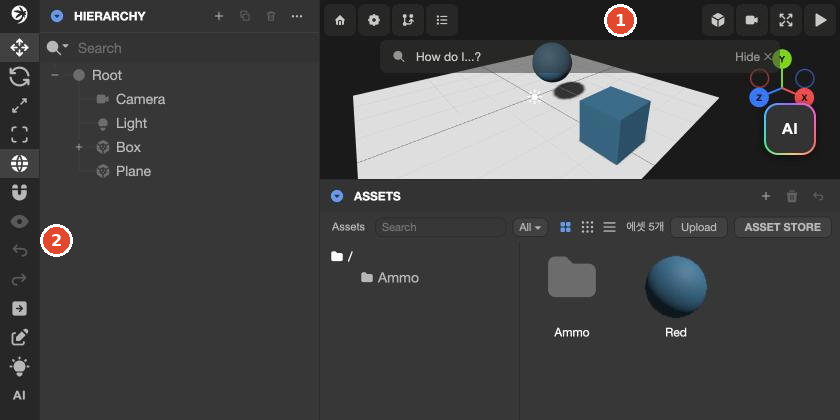
Top bar — From the left: the house icon that takes you back to the project list, ⚙ (scene settings), main, the scene name, How do I...?, Standard / Perspective, hide panels (four-squares icon), and ▶ Launch. Clicking the scene name opens the SCENES window with the list of scenes (Create and switch scenes). ▶ Launch runs the game in a new tab (Run with Launch).
When the window is narrow, top bar buttons show only icons, without text. On 2026-10-29, in a 1275px-wide window, only icons were visible while the panels were shown; when we hid the panels with Space, the text main, the scene name, Standard, Perspective, and Launch appeared. Hover over an icon to see its name.
Left vertical toolbar — At the top are four transform tools (1–4), followed by World/Local · Snap · Focus, Undo · Redo, Publish / Download, Code Editor, Bake Lightmaps (light bulb icon), and AI Game Builder. At the bottom are How do I...? · Controls (shortcut list) · Settings (editor settings). When you hover over the fourth transform tool, it shows Resize Element Component; it resizes on-screen UI elements.
You can hide both side panels at once and bring them back with the hide panels icon or Space. If you type while no input field is focused, Space is treated as a shortcut and the panels disappear, so if the panels suddenly vanish, press Space once more.
Bottom bar and saving
The bottom bar of the screen has Cloud Save and a live status indicator. Values you edit manually and changes the AI makes are kept immediately without clicking Cloud Save (confirmed after a refresh). What we observed for each indicator and how saving works are explained in Autosave.